First Steps in the Game
From FragoriaWiki
(→Copper Mountain) |
(→Improving Your Items) |
||
| (107 intermediate revisions not shown) | |||
| Line 1: | Line 1: | ||
== Welcome to Fragoria == | == Welcome to Fragoria == | ||
| - | |||
| + | In front of you are the Lands of Fragoria,a beautiful world created by a mix of heroic sages of ancient Russia, and also modern tales. It's a beautiful and unique universe in which you can make your own history. So at this moment, you will begin your path... | ||
| - | == Guide == | + | == How to Use this Guide == |
| - | + | ||
| - | + | This guide contains information that all new players should know in order to be successful, and it is intended to be as short as possible. Only important stuff here. | |
| - | + | ||
| - | + | ||
| - | + | ||
| - | + | As your first character, you should work to achieve the following goals: | |
| + | *Reach level 70 | ||
| + | *Select your favorite class | ||
| + | *Raise a Pet | ||
| + | *Feed your pet | ||
| - | + | The reason for these goals, is that at level 70, you will have access to more exciting parts of the game that have level restrictions. This will be explained more later. Lets get started! | |
| - | + | ||
| - | + | == Levels 1 - 10 == | |
| - | The | + | === The Tutorial and Beginning Quests === |
| - | + | ||
| - | + | ||
| - | + | ||
| - | + | ||
| - | + | ||
| - | + | ||
| - | + | The game has a nice tutorial that is easy to follow in the beginning, so we'll skip going over the part. However, make sure you do the following and get all these free items from quests: | |
| - | + | {| table cellpadding="6" cellspacing="0" class="smallertexttable standart collapsible collapsed" style="float:right; margin-left: 10px;" | |
| + | ! style="background-color: #d2b48c;min-width:200px;"| Help: Using minimap | ||
| + | |- | ||
| + | |[[image:Faq_098.jpg]] | ||
| + | In the upper left corner of the screen is the minimap. It marks the location of the character as well as different items. | ||
| + | * Position and direction of view of the character appears as: [[image:Faq_022.jpg]]. | ||
| + | * NPC with assignments, designated as follows:[[image:Faq_023.jpg]]. More information about the jobs can be found in section [[Quest]]. | ||
| + | * Quest mob/item or NPC location designated as [[image:Quest6_Ekna.jpg]][[image:Quest4_Ekna.jpg]][[image:Quest9_Ekna.jpg]] | ||
| + | * Passages to other locations are designated as follows: [[image:Faq_029.jpg]] | ||
| + | * Another character who is member in your group looks like this[[image:Faq_030.jpg]] . More information about the groups you can read in the [[Groups]] . | ||
| + | * Location of resources nearby depending on your trained harvesting profession. More information about Resources, you can read in [[Beginner Craft]] | ||
| - | + | In one corner of the minimap a button [[image:Faq_021.jpg]] , clicking on which you can see the large map of your location. On the large map, the marks symbols are same as on minimap but shown for large area. Resources location are shown on whole map only if you are on [[Tariff Plans|Premium Plan]]. Moreover, character’s coordinates is shown in upper edge of the large map. | |
| + | |} | ||
| + | *Understand how to use the map. | ||
| + | *Obtain free pet cocoon. | ||
| + | *Hatch the cocoon (either wait 24 hours or use the free Accelerator). | ||
| - | + | {| table cellpadding="6" cellspacing="0" class="smallertexttable standart collapsible collapsed" style="float:right; margin-left: 10px;" | |
| + | ! style="background-color: #d2b48c;min-width:200px;" colspan="6"| Help: Important Quests | ||
| + | |- | ||
| + | ! Tutorial Quests NPC | ||
| + | ! NPC Location | ||
| + | ! Quest Name | ||
| + | ! Objective | ||
| + | ! Objective Location | ||
| + | ! Special Rewards | ||
| + | |- | ||
| + | | Ilya Muromian | ||
| + | | Tutorial Map (First Map) | ||
| + | | See Fragoville Counselor | ||
| + | | Search for NPC - Fragoville Counselor | ||
| + | | Fragoville (-6/-25) | ||
| + | | Teleport to Fragoville, Purple Knife, Blue Cloak | ||
| + | |- | ||
| + | | Fragoville Counselor | ||
| + | | Fragoville (-6/-25) | ||
| + | | Famous Trader | ||
| + | | Search for NPC - Famous Merchant | ||
| + | | Fragoville (-22/-42) | ||
| + | | Blue Boots | ||
| + | |- | ||
| + | | Famous Merchant | ||
| + | | Fragoville (-22/-42) | ||
| + | | Village: Wolves by the Western Bridge | ||
| + | | Kill Monster - Steppen Wolf Cub | ||
| + | | Middle Lands (-50/-55) | ||
| + | | Blue Pauldrons | ||
| + | |- | ||
| + | | | ||
| + | | | ||
| + | | | ||
| + | | Kill Monster - Dirty Wolf Cub | ||
| + | | Middle Lands (-57/-21) | ||
| + | | | ||
| + | |- | ||
| + | ! Potion Quest NPC | ||
| + | ! NPC Location | ||
| + | ! Quest Name | ||
| + | ! Objective | ||
| + | ! Objective Location | ||
| + | ! Special Rewards | ||
| + | |- | ||
| + | | Coach Ratislav | ||
| + | | Fragoville (-11/-35) | ||
| + | | Village: Go to the Old Healer | ||
| + | | Search for NPC - Sorceress Medunica | ||
| + | | Fragoville (-24/-52) | ||
| + | | Blue Amulet | ||
| + | |- | ||
| + | ! Flour Quests NPC | ||
| + | ! NPC Location | ||
| + | ! Quest Name | ||
| + | ! Objective | ||
| + | ! Objective Location | ||
| + | ! Special Rewards | ||
| + | |- | ||
| + | | Famous Merchant | ||
| + | | Fragoville (-22/-42) | ||
| + | | Village: Find Petrovich | ||
| + | | Search for NPC - Petrovich | ||
| + | | Middle Lands (-86/-38) | ||
| + | | | ||
| + | |- | ||
| + | | Petrovich | ||
| + | | Middle Lands (-86/-38) | ||
| + | | Petrovich: Find Counselor Hitropuz | ||
| + | | Search for NPC - Hitropuz | ||
| + | | Middle Lands (-108/-90) | ||
| + | | | ||
| + | |- | ||
| + | | Hitropuz | ||
| + | | Middle Lands (-108/-90) | ||
| + | | Milly: Roosters in Milly | ||
| + | | Kill Monster - Fire Rooster | ||
| + | | Middle Lands (-140/-40) | ||
| + | | | ||
| + | |- | ||
| + | | | ||
| + | | | ||
| + | | | ||
| + | | Kill Monster - Bright Rooster | ||
| + | | Middle Lands (-162/-65) | ||
| + | | | ||
| + | |- | ||
| + | | | ||
| + | | | ||
| + | | | ||
| + | | Kill Monster - Clawed Rooster | ||
| + | | Middle Lands (-166/-53) | ||
| + | | | ||
| + | |- | ||
| + | | Hitropuz | ||
| + | | Middle Lands (-108/-90) | ||
| + | | Milly: Collect the Harvest | ||
| + | | Search for Item - Sheaf of Rye | ||
| + | | Middle Lands (-115/-74) | ||
| + | | | ||
| + | |- | ||
| + | | | ||
| + | | | ||
| + | | | ||
| + | | Search for NPC - Miller Mukoedov | ||
| + | | Middle Lands (-111/-52) | ||
| + | | | ||
| + | |- | ||
| + | | Miller Mukoaedov | ||
| + | | Middle Lands (-111/-52) | ||
| + | | Milly: Take Flour to Kolosiha | ||
| + | | Search for NPC - Kolosiha | ||
| + | | Middle Lands (-144/-61) | ||
| + | | Blue Helm | ||
| + | |- | ||
| + | ! Pet Quests NPC | ||
| + | ! NPC Location | ||
| + | ! Quest Name | ||
| + | ! Objective | ||
| + | ! Objective Location | ||
| + | ! Special Rewards | ||
| + | |- | ||
| + | | Famous Merchant | ||
| + | | Fragoville (-22/-42) | ||
| + | | To Zabava Veselovna | ||
| + | | Search for NPC - Zabava Veselovna | ||
| + | | Middle Lands (-126/-84) | ||
| + | | Blue Cuffs | ||
| + | |- | ||
| + | | Zabava Veselovna | ||
| + | | Middle Lands (-126/-84) | ||
| + | | Pets: Searching for the Magic Cocoon | ||
| + | | Search for NPC - Kolosiha | ||
| + | | Middle Lands (-144/-61) | ||
| + | | Blue Belt | ||
| + | |- | ||
| + | | Kolosiha | ||
| + | | Middle Lands (-144/-61) | ||
| + | | Milly: Bring Some Coal | ||
| + | | Kill Monster for Item - Hot Piece of Coal | ||
| + | | Middle Lands (-144/-61) | ||
| + | | Blue Gloves | ||
| + | |- | ||
| + | | Kolosiha | ||
| + | | Middle Lands (-144/-61) | ||
| + | | Milly: Take Pies to the Grandson | ||
| + | | Search for NPC - Grandson | ||
| + | | Middle Lands (-152/-46) | ||
| + | | Upgrading Gem | ||
| + | |- | ||
| + | | Kolosiha | ||
| + | | Middle Lands (-144/-61) | ||
| + | | Milly: Lost Gingerbread Roll | ||
| + | | Search for NPC - Gingerbread Roll | ||
| + | | Middle Lands (-210/-44) | ||
| + | | | ||
| + | |- | ||
| + | | Gingerbread Roll | ||
| + | | Middle Lands (-210/-44) | ||
| + | | Gingerbread Roll: Help Getting Out | ||
| + | | Guide NPC, Kill Monsters | ||
| + | | Follow NPC | ||
| + | | | ||
| + | |- | ||
| + | | Gingerbread Roll | ||
| + | | Middle Lands (-210/-44) | ||
| + | | Gingerbread Roll: Return to Kolosiha | ||
| + | | Search for NPC - Kolosiha | ||
| + | | Middle Lands (-144/-61) | ||
| + | | Magic Cocoon | ||
| + | |- | ||
| + | | Kolosiha | ||
| + | | Middle Lands (-144/-61) | ||
| + | | Pets: Magic Cocoon | ||
| + | | Search for NPC - Zabava Veselovna | ||
| + | | Middle Lands (-126/-84) | ||
| + | | Awakener, Pet Food | ||
| + | |- | ||
| + | | Kolosiha | ||
| + | | Middle Lands (-144/-61) | ||
| + | | Gingerbread Roll: Fresh Gingerbread to Hitropuz | ||
| + | | Search for NPC - Hitropuz | ||
| + | | Middle Lands (-108/-90) | ||
| + | | | ||
| + | |- | ||
| + | | Hitropuz | ||
| + | | Middle Lands (-108/-90) | ||
| + | | Milly: Take an Order to Uncle Boris | ||
| + | | Search for NPC - Uncle Boris | ||
| + | | Middle Lands (-72/-133) | ||
| + | | | ||
| + | |- | ||
| + | | Uncle Boris | ||
| + | | Middle Lands (-72/-133) | ||
| + | | Farm: Loss from Fire | ||
| + | | Kill Monster - Scarlet Rooster | ||
| + | | Middle Lands (-102/-130) | ||
| + | | | ||
| + | |- | ||
| + | | | ||
| + | | | ||
| + | | | ||
| + | | Kill Monster - Mountain Rooster | ||
| + | | Middle Lands (-77/-160) | ||
| + | | | ||
| + | |- | ||
| + | | Uncle Boris | ||
| + | | Middle Lands (-72/-133) | ||
| + | | Farm: Marked Rotten | ||
| + | | Kill Monster - Marked Rotten | ||
| + | | Middle Lands (-46/-176) | ||
| + | | | ||
| + | |- | ||
| + | | Uncle Boris | ||
| + | | Middle Lands (-72/-133) | ||
| + | | Farm: Snakes in the Church Graveyard | ||
| + | | Kill Monster for Item - Precious Heart | ||
| + | | Cave in Middle Lands (-38/-161) | ||
| + | | Blue Pants | ||
| + | |- | ||
| + | | Uncle Boris | ||
| + | | Middle Lands (-72/-133) | ||
| + | | Pets: Rapid Appearance | ||
| + | | Search for NPC - Beloyara Veselovna | ||
| + | | Middle Lands (-105/-301) | ||
| + | | Accelerator of Pet Birth | ||
| + | |} | ||
| - | + | *Obtain all the free blue items (and wear them) from beginning quests. | |
| - | + | === Chatting and Asking Questions === | |
| + | One of the easiest ways to find answers is to ask for them! So it's a good idea to get familiarized with the chat interface. | ||
| + | [[image:Newplayer-chat.png|350px|Chat Interface]] | ||
| - | + | === More Quests === | |
| + | [[image:Beginnerquestinfo.png|500px|right]] | ||
| + | In the beginning levels, quests are the quickest and easiest sources of experience, so be sure to speak with all the NPCs that give out the quests. Generally, they comprise of these types of quests: | ||
| - | + | *Search for Another NPC | |
| + | *Search for Item | ||
| + | *Kill Monsters | ||
| + | *Kill Monsters for Item | ||
| + | *Guide Another NPC | ||
| + | '''Important Note''': The quest color (green in the example) denotes the difficulty relative to your character level. What that means is that you'll have to travel to higher maps as you gain levels, in order to find green colored quests. If you notice the quest you are is white, try to skip them and move on to a later map (with higher-leveled mobs). | ||
| + | === Professions === | ||
| - | + | As a basic summary, there are 4x resource collecting professions, and 4x crafting professions. The crafting professions allow you to make different items ingame, with the resources you collect from the resource collecting professions. | |
| - | + | As a recommendation, you should get the Beastmaster profession for your first. Many of the items crafted are crucial to growing your pet, and most items are binded to your character, meaning you will have difficulty purchasing it from other players. | |
| - | + | === Feeding and Growing Your Pet (And Leveling) === | |
| - | + | [[image:Newplayer-copper-small.png|right]] | |
| - | + | Play subscription minigames and trade any colored wallet signs for pet food/pet exp. To play, click the checkbox icon on the bottom right, then click "Copper Mountain" under the PvE Games tab, and click join. | |
| - | ' | + | After you've received signs, click My Wallet on the top of the screen, click "Sign of Varangian", and then click "Use". This will open the sign shop menu so you can see prices and available items. Finally, click the last button on the next popup screen (titled "Gems") to view pet potions. See image below. |
| + | [[image:Sign-purchase.jpg|500px]] | ||
| - | + | === Collecting Red Balls for Pet Food and Experience === | |
| - | + | This method of leveling is available only till you are level 10, so take advantage of it before you level up! | |
| - | + | #Visit Pastures in Fragoville. The portal is at coordinates (16/-30). You must be in Fragoville before using the coordinates. Each map has a different coordinate origin. | |
| + | #Collect Red Balls by killing the wolves inside the pastures. | ||
| + | #Trade Red Balls for pet food/exp or other items, with Exchanger Nikifor next to the pasture portal. | ||
| - | + | [[image:Ballcaveloca.png|322px|Visit the Red Ball Cave]][[image:Ballcave.png|450px]] | |
| + | === Level 9 : Pick Your Favorite Class === | ||
| - | + | At level 9, the game will ask you to pick between Shaman or Strongman, which are two subclasses that will lead to more classes as you level up. Here's a simple class tree along with basic description of final class: | |
| + | *Strongman | ||
| + | **Soldier | ||
| + | ***Diamond Protector - large HP and defense against nonmagic. | ||
| + | ***Semiprecious Protector - large HP and defense against magic. | ||
| + | **Warrior | ||
| + | ***Knight - strong physical melee attacks, weakens other physical attackers. | ||
| + | ***Berserk - strong physical melee attacks, able to close distance to enemy quickly. | ||
| + | **Hunter | ||
| + | ***Spy - ranged attacks, lifesteals and debilitates enemies. | ||
| + | ***Front-line Soldier - ranged attacks, prevents magic casting | ||
| + | *Shaman | ||
| + | **Healer | ||
| + | ***Wizard - Weak attack, heals self and friendly players. | ||
| + | ***Herbalist - Weak attack, provides healing buffs. | ||
| + | **Sorcerer | ||
| + | ***Fire Spellweaver - massive fire damage, boosts mana quantity. | ||
| + | ***Ice Spellweaver - massive water damage, regenerates mana. | ||
| - | |||
| - | + | So if you would like to be a Wizard later on, select "Shaman" at level 9, then "Healer" at level 15. | |
| - | + | == Level 11-20 == | |
| + | === Level 11: My Horse Disappeared! === | ||
| - | + | [[image:Newplayer-gettofrago.png|right|400px]] | |
| + | The first horse you receive is only a temporary horse. Getting a permanent horse is easy. All you have to do, is visit Trade County in Fragotown, and you'll receive another free horse. Open your map and reach your way downwards towards the black arrow titled, "Fragotown". Below is an example route you can take if you are in Fragoville. | ||
| - | ' | + | Once you're in Fragotown, open your map once more and reach the red square depicted below. The horse you'll receive is also included in the picture below. |
| - | + | [[image:Newplayer-fragotradecounty.png|400px]] | |
| - | + | === Joining the Right Minigame === | |
| - | + | At this level range, you should try to join "easy difficulty" Nuts game. | |
| + | [[image:Sub-button.jpg|400px]] | ||
| - | + | While you are waiting for that minigame to start, you can also finish up on quests or visit the ball caves for level 11+. | |
| - | === | + | === Ball Caves for Levels 11 and Onward - Pastures === |
| - | [[ | + | [[image:Pasture-Magic1.png|thumb|Magic Page 1]] |
| + | [[image:Pasture-Pet1.png|thumb|Pet Page 1]] | ||
| + | [[image:Pasture-Pet2.png|thumb|Pet Page 2]] | ||
| + | [[image:Pasture-Craft1.png|thumb|Craft Page 1]] | ||
| - | + | The ball cave in Fragoville mentioned earlier is only available till level 10. However, there are ball caves for levels 11+ around Fragotown, and they are called Pastures. The entrances are divided by level range, and a different Pasture exists for the following character level ranges: | |
| - | + | ||
| - | * | + | *Lvl 10-19 |
| - | * | + | *Lvl 20-29 |
| - | + | *Lvl 30-39 | |
| + | *Lvl 40-49 | ||
| + | *Lvl 50-59 | ||
| + | *Lvl 60-69 | ||
| + | *Lvl 70-79 | ||
| + | *Lvl 80-100 | ||
| - | + | Take a look below to see the different entrances around Fragotown (marked by the red circles with white cow outlines). As with the Fragoville ball cave, the NPCs that trades the balls for items are located near each of the entrances and will ask for different colored balls depending on the specific level range Pasture. Note that the pet food and experience bottles are on the Pet tab, page 1. | |
| - | + | ||
| - | + | ||
| - | + | ||
| - | + | ||
| - | + | ||
| - | + | ||
| - | + | ||
| - | + | ||
| - | + | ||
| - | + | ||
| + | [[image:Victoryday-fragotown.jpg|600px]] | ||
| - | + | == Levels 21-69 == | |
| - | + | === Improving Your Items === | |
| - | + | You'll find quests become increasingly more difficult. Follow these procedures to upgrade your items. It is recommended that you do not exceed +3 upgrades. | |
| - | + | [[image:Itemupgrade-improvement.png|180px|thumb|Item Improvement Window]] | |
| - | + | Click on the '''Improvement''' icon on the Character page: | |
| - | + | ||
| - | + | [[image:item_upgrade.png]] | |
| - | * | + | |
| - | * | + | # Click '''Improve'''. |
| + | # Place your item in the center. | ||
| + | # If the required gems are in your bag, they will be placed automatically in the gem slots. | ||
| + | # Checkmark will be clickable once all required gems are in place. | ||
| + | |||
| + | A preview of the upgrade results will appear after placing the correct gems into the window. | ||
| + | |||
| + | === OPTIONAL: Make friends! Join a Guild! === | ||
| + | |||
| + | Although this section is optional, you will need friends and other players to share your goals! You will be more successful and earn more prizes for some group events later on in the game. | ||
| + | |||
| + | === Understanding How Subscription Games Start === | ||
| + | |||
| + | At this level range, you should explore different subscription games (minigames) to see which occur most often at your current level. The two most often-occuring games are: | ||
| + | * Blue "Nuts" at levels 21-50 (select "Medium" difficulty) | ||
| + | * Yellow "Kikimora's Den" at levels 51+ (select "Hard" difficulty) | ||
| + | |||
| + | First, lets understand how minigames start. The following rules apply: | ||
| + | *If the maximum amount of players join, the game starts immediately. | ||
| + | *If more than half of the required number of players join, then the game starts after 10 minutes. | ||
| + | *Place your mouse over the subscription button after you've joined to see the number of players joined in the queue. | ||
| + | |||
| + | [[image:Newplayers-understandsubbutton.png]] | ||
| + | |||
| + | In the example above, it takes 10 players to start the game immediately, and only 6 to start it after 10 minutes. By cancelling and joining a different game, you can see which game is most likely to start. | ||
| + | |||
| + | == Level 70 (and Higher) == | ||
| + | |||
| + | Congratulations! You Reached Level 70! | ||
| + | |||
| + | So you made it to level 70! What now? Well, Fragoria is now a whole new place with many more exciting events to learn about and attend: | ||
| + | * Daily Epic Game (Level 61+) - Earn Signs of Commander everyday! | ||
| + | * Room of Terror (Level 70+) - Obtain Black and Fire Crystals for your Obsidian pet items. | ||
| + | * Island of Thule (Level 70+) - Collect motorcycle parts, and eventually make a motorcycle. | ||
| + | * Caravan Way (the higher level, the better) - Collect purple resources for crafting. | ||
| + | * And many, many more! | ||
| + | |||
| + | == I Have Some Emeralds! What Should I Do With Them? == | ||
| + | |||
| + | Further into the game, you will probably start to accumulate wealth and Emeralds. So this section will mention what you should do with them. | ||
| - | + | The most important investment you'll ever make will be a Mighty Dragon. It's damage and speed is crucial to your life in Fragoria. | |
Current revision as of 02:23, 4 February 2016
Contents |
Welcome to Fragoria
In front of you are the Lands of Fragoria,a beautiful world created by a mix of heroic sages of ancient Russia, and also modern tales. It's a beautiful and unique universe in which you can make your own history. So at this moment, you will begin your path...
How to Use this Guide
This guide contains information that all new players should know in order to be successful, and it is intended to be as short as possible. Only important stuff here.
As your first character, you should work to achieve the following goals:
- Reach level 70
- Select your favorite class
- Raise a Pet
- Feed your pet
The reason for these goals, is that at level 70, you will have access to more exciting parts of the game that have level restrictions. This will be explained more later. Lets get started!
Levels 1 - 10
The Tutorial and Beginning Quests
The game has a nice tutorial that is easy to follow in the beginning, so we'll skip going over the part. However, make sure you do the following and get all these free items from quests:
| Help: Using minimap |
|---|
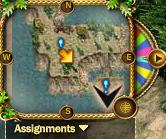
In the upper left corner of the screen is the minimap. It marks the location of the character as well as different items.
In one corner of the minimap a button |
- Understand how to use the map.
- Obtain free pet cocoon.
- Hatch the cocoon (either wait 24 hours or use the free Accelerator).
| Help: Important Quests | |||||
|---|---|---|---|---|---|
| Tutorial Quests NPC | NPC Location | Quest Name | Objective | Objective Location | Special Rewards |
| Ilya Muromian | Tutorial Map (First Map) | See Fragoville Counselor | Search for NPC - Fragoville Counselor | Fragoville (-6/-25) | Teleport to Fragoville, Purple Knife, Blue Cloak |
| Fragoville Counselor | Fragoville (-6/-25) | Famous Trader | Search for NPC - Famous Merchant | Fragoville (-22/-42) | Blue Boots |
| Famous Merchant | Fragoville (-22/-42) | Village: Wolves by the Western Bridge | Kill Monster - Steppen Wolf Cub | Middle Lands (-50/-55) | Blue Pauldrons |
| Kill Monster - Dirty Wolf Cub | Middle Lands (-57/-21) | ||||
| Potion Quest NPC | NPC Location | Quest Name | Objective | Objective Location | Special Rewards |
| Coach Ratislav | Fragoville (-11/-35) | Village: Go to the Old Healer | Search for NPC - Sorceress Medunica | Fragoville (-24/-52) | Blue Amulet |
| Flour Quests NPC | NPC Location | Quest Name | Objective | Objective Location | Special Rewards |
| Famous Merchant | Fragoville (-22/-42) | Village: Find Petrovich | Search for NPC - Petrovich | Middle Lands (-86/-38) | |
| Petrovich | Middle Lands (-86/-38) | Petrovich: Find Counselor Hitropuz | Search for NPC - Hitropuz | Middle Lands (-108/-90) | |
| Hitropuz | Middle Lands (-108/-90) | Milly: Roosters in Milly | Kill Monster - Fire Rooster | Middle Lands (-140/-40) | |
| Kill Monster - Bright Rooster | Middle Lands (-162/-65) | ||||
| Kill Monster - Clawed Rooster | Middle Lands (-166/-53) | ||||
| Hitropuz | Middle Lands (-108/-90) | Milly: Collect the Harvest | Search for Item - Sheaf of Rye | Middle Lands (-115/-74) | |
| Search for NPC - Miller Mukoedov | Middle Lands (-111/-52) | ||||
| Miller Mukoaedov | Middle Lands (-111/-52) | Milly: Take Flour to Kolosiha | Search for NPC - Kolosiha | Middle Lands (-144/-61) | Blue Helm |
| Pet Quests NPC | NPC Location | Quest Name | Objective | Objective Location | Special Rewards |
| Famous Merchant | Fragoville (-22/-42) | To Zabava Veselovna | Search for NPC - Zabava Veselovna | Middle Lands (-126/-84) | Blue Cuffs |
| Zabava Veselovna | Middle Lands (-126/-84) | Pets: Searching for the Magic Cocoon | Search for NPC - Kolosiha | Middle Lands (-144/-61) | Blue Belt |
| Kolosiha | Middle Lands (-144/-61) | Milly: Bring Some Coal | Kill Monster for Item - Hot Piece of Coal | Middle Lands (-144/-61) | Blue Gloves |
| Kolosiha | Middle Lands (-144/-61) | Milly: Take Pies to the Grandson | Search for NPC - Grandson | Middle Lands (-152/-46) | Upgrading Gem |
| Kolosiha | Middle Lands (-144/-61) | Milly: Lost Gingerbread Roll | Search for NPC - Gingerbread Roll | Middle Lands (-210/-44) | |
| Gingerbread Roll | Middle Lands (-210/-44) | Gingerbread Roll: Help Getting Out | Guide NPC, Kill Monsters | Follow NPC | |
| Gingerbread Roll | Middle Lands (-210/-44) | Gingerbread Roll: Return to Kolosiha | Search for NPC - Kolosiha | Middle Lands (-144/-61) | Magic Cocoon |
| Kolosiha | Middle Lands (-144/-61) | Pets: Magic Cocoon | Search for NPC - Zabava Veselovna | Middle Lands (-126/-84) | Awakener, Pet Food |
| Kolosiha | Middle Lands (-144/-61) | Gingerbread Roll: Fresh Gingerbread to Hitropuz | Search for NPC - Hitropuz | Middle Lands (-108/-90) | |
| Hitropuz | Middle Lands (-108/-90) | Milly: Take an Order to Uncle Boris | Search for NPC - Uncle Boris | Middle Lands (-72/-133) | |
| Uncle Boris | Middle Lands (-72/-133) | Farm: Loss from Fire | Kill Monster - Scarlet Rooster | Middle Lands (-102/-130) | |
| Kill Monster - Mountain Rooster | Middle Lands (-77/-160) | ||||
| Uncle Boris | Middle Lands (-72/-133) | Farm: Marked Rotten | Kill Monster - Marked Rotten | Middle Lands (-46/-176) | |
| Uncle Boris | Middle Lands (-72/-133) | Farm: Snakes in the Church Graveyard | Kill Monster for Item - Precious Heart | Cave in Middle Lands (-38/-161) | Blue Pants |
| Uncle Boris | Middle Lands (-72/-133) | Pets: Rapid Appearance | Search for NPC - Beloyara Veselovna | Middle Lands (-105/-301) | Accelerator of Pet Birth |
- Obtain all the free blue items (and wear them) from beginning quests.
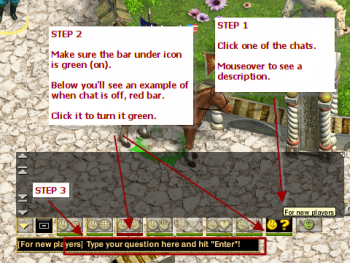
Chatting and Asking Questions
One of the easiest ways to find answers is to ask for them! So it's a good idea to get familiarized with the chat interface.
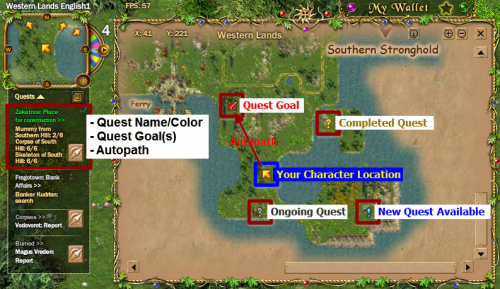
More Quests
In the beginning levels, quests are the quickest and easiest sources of experience, so be sure to speak with all the NPCs that give out the quests. Generally, they comprise of these types of quests:
- Search for Another NPC
- Search for Item
- Kill Monsters
- Kill Monsters for Item
- Guide Another NPC
Important Note: The quest color (green in the example) denotes the difficulty relative to your character level. What that means is that you'll have to travel to higher maps as you gain levels, in order to find green colored quests. If you notice the quest you are is white, try to skip them and move on to a later map (with higher-leveled mobs).
Professions
As a basic summary, there are 4x resource collecting professions, and 4x crafting professions. The crafting professions allow you to make different items ingame, with the resources you collect from the resource collecting professions.
As a recommendation, you should get the Beastmaster profession for your first. Many of the items crafted are crucial to growing your pet, and most items are binded to your character, meaning you will have difficulty purchasing it from other players.
Feeding and Growing Your Pet (And Leveling)
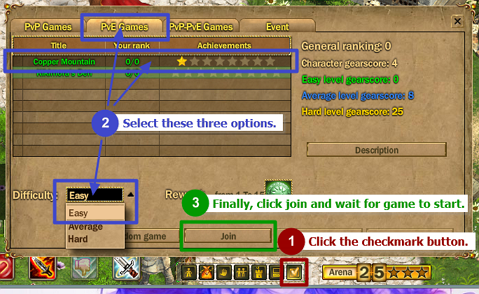
Play subscription minigames and trade any colored wallet signs for pet food/pet exp. To play, click the checkbox icon on the bottom right, then click "Copper Mountain" under the PvE Games tab, and click join.
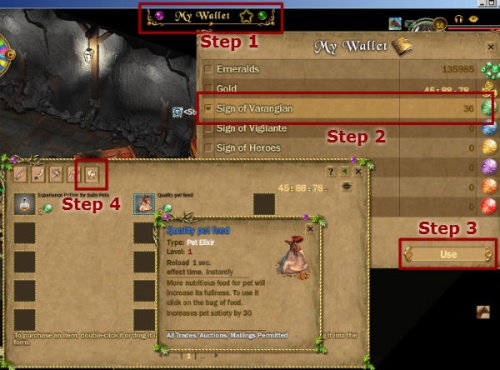
After you've received signs, click My Wallet on the top of the screen, click "Sign of Varangian", and then click "Use". This will open the sign shop menu so you can see prices and available items. Finally, click the last button on the next popup screen (titled "Gems") to view pet potions. See image below.
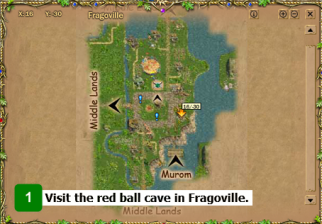
Collecting Red Balls for Pet Food and Experience
This method of leveling is available only till you are level 10, so take advantage of it before you level up!
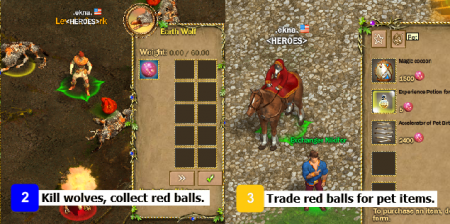
- Visit Pastures in Fragoville. The portal is at coordinates (16/-30). You must be in Fragoville before using the coordinates. Each map has a different coordinate origin.
- Collect Red Balls by killing the wolves inside the pastures.
- Trade Red Balls for pet food/exp or other items, with Exchanger Nikifor next to the pasture portal.
Level 9 : Pick Your Favorite Class
At level 9, the game will ask you to pick between Shaman or Strongman, which are two subclasses that will lead to more classes as you level up. Here's a simple class tree along with basic description of final class:
- Strongman
- Soldier
- Diamond Protector - large HP and defense against nonmagic.
- Semiprecious Protector - large HP and defense against magic.
- Warrior
- Knight - strong physical melee attacks, weakens other physical attackers.
- Berserk - strong physical melee attacks, able to close distance to enemy quickly.
- Hunter
- Spy - ranged attacks, lifesteals and debilitates enemies.
- Front-line Soldier - ranged attacks, prevents magic casting
- Soldier
- Shaman
- Healer
- Wizard - Weak attack, heals self and friendly players.
- Herbalist - Weak attack, provides healing buffs.
- Sorcerer
- Fire Spellweaver - massive fire damage, boosts mana quantity.
- Ice Spellweaver - massive water damage, regenerates mana.
- Healer
So if you would like to be a Wizard later on, select "Shaman" at level 9, then "Healer" at level 15.
Level 11-20
Level 11: My Horse Disappeared!
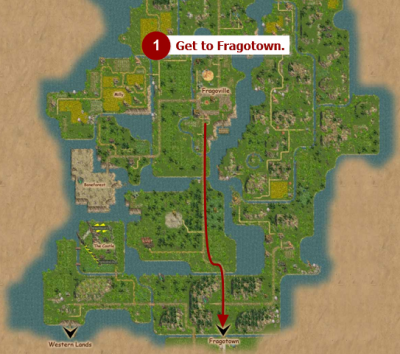
The first horse you receive is only a temporary horse. Getting a permanent horse is easy. All you have to do, is visit Trade County in Fragotown, and you'll receive another free horse. Open your map and reach your way downwards towards the black arrow titled, "Fragotown". Below is an example route you can take if you are in Fragoville.
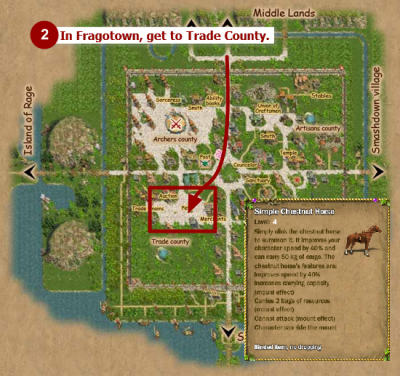
Once you're in Fragotown, open your map once more and reach the red square depicted below. The horse you'll receive is also included in the picture below.
Joining the Right Minigame
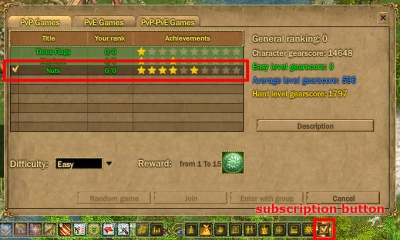
At this level range, you should try to join "easy difficulty" Nuts game.
While you are waiting for that minigame to start, you can also finish up on quests or visit the ball caves for level 11+.
Ball Caves for Levels 11 and Onward - Pastures
The ball cave in Fragoville mentioned earlier is only available till level 10. However, there are ball caves for levels 11+ around Fragotown, and they are called Pastures. The entrances are divided by level range, and a different Pasture exists for the following character level ranges:
- Lvl 10-19
- Lvl 20-29
- Lvl 30-39
- Lvl 40-49
- Lvl 50-59
- Lvl 60-69
- Lvl 70-79
- Lvl 80-100
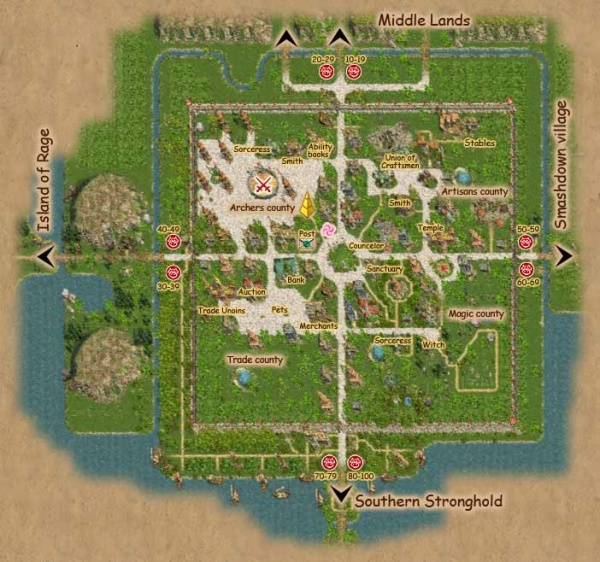
Take a look below to see the different entrances around Fragotown (marked by the red circles with white cow outlines). As with the Fragoville ball cave, the NPCs that trades the balls for items are located near each of the entrances and will ask for different colored balls depending on the specific level range Pasture. Note that the pet food and experience bottles are on the Pet tab, page 1.
Levels 21-69
Improving Your Items
You'll find quests become increasingly more difficult. Follow these procedures to upgrade your items. It is recommended that you do not exceed +3 upgrades.
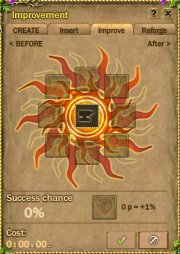
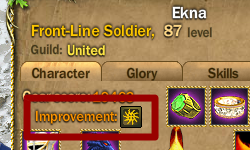
Click on the Improvement icon on the Character page:
- Click Improve.
- Place your item in the center.
- If the required gems are in your bag, they will be placed automatically in the gem slots.
- Checkmark will be clickable once all required gems are in place.
A preview of the upgrade results will appear after placing the correct gems into the window.
OPTIONAL: Make friends! Join a Guild!
Although this section is optional, you will need friends and other players to share your goals! You will be more successful and earn more prizes for some group events later on in the game.
Understanding How Subscription Games Start
At this level range, you should explore different subscription games (minigames) to see which occur most often at your current level. The two most often-occuring games are:
- Blue "Nuts" at levels 21-50 (select "Medium" difficulty)
- Yellow "Kikimora's Den" at levels 51+ (select "Hard" difficulty)
First, lets understand how minigames start. The following rules apply:
- If the maximum amount of players join, the game starts immediately.
- If more than half of the required number of players join, then the game starts after 10 minutes.
- Place your mouse over the subscription button after you've joined to see the number of players joined in the queue.
In the example above, it takes 10 players to start the game immediately, and only 6 to start it after 10 minutes. By cancelling and joining a different game, you can see which game is most likely to start.
Level 70 (and Higher)
Congratulations! You Reached Level 70!
So you made it to level 70! What now? Well, Fragoria is now a whole new place with many more exciting events to learn about and attend:
- Daily Epic Game (Level 61+) - Earn Signs of Commander everyday!
- Room of Terror (Level 70+) - Obtain Black and Fire Crystals for your Obsidian pet items.
- Island of Thule (Level 70+) - Collect motorcycle parts, and eventually make a motorcycle.
- Caravan Way (the higher level, the better) - Collect purple resources for crafting.
- And many, many more!
I Have Some Emeralds! What Should I Do With Them?
Further into the game, you will probably start to accumulate wealth and Emeralds. So this section will mention what you should do with them.
The most important investment you'll ever make will be a Mighty Dragon. It's damage and speed is crucial to your life in Fragoria.
