How to Create New Wiki Quest Pages
From FragoriaWiki
(→Show Uploaded Screenshot on Page) |
(→Show Uploaded Screenshot on Page) |
||
| Line 80: | Line 80: | ||
:; <nowiki>[[File:wizkam-evilbones.jpg|300px|link=]]</nowiki> | :; <nowiki>[[File:wizkam-evilbones.jpg|300px|link=]]</nowiki> | ||
| - | : "wizkam-evilbones.jpg" is the file name of the image uploaded in previous step. | + | :: "wizkam-evilbones.jpg" is the file name of the image uploaded in previous step. |
| - | : the 300px resizes the image | + | :: the 300px resizes the image |
| - | : "link=" removes http reference on the image. | + | :: "link=" removes http reference on the image. |
| - | : note that each image code element is separated by "|". | + | :: note that each image code element is separated by "|". |
| - | ; <nowiki>[[File:wizkam-angrybon.jpg|left|500px|link=]]</nowiki> | + | :; <nowiki>[[File:wizkam-angrybon.jpg|left|500px|link=]]</nowiki> |
| - | : "wizkam-angrybon.jpg" is the file name of the image uploaded in previous step. | + | :: "wizkam-angrybon.jpg" is the file name of the image uploaded in previous step. |
| - | : "left" aligns the image to the left side of page | + | :: "left" aligns the image to the left side of page |
| - | : the 500px resizes the image | + | :: the 500px resizes the image |
| - | : "link=" removes http reference on the image. | + | :: "link=" removes http reference on the image. |
| - | : note that each image code element is separated by "|". | + | :: note that each image code element is separated by "|". |
| - | ; <nowiki>[[File:Wizkam-evilbones-com.jpg|link=]]</nowiki> | + | :; <nowiki>[[File:Wizkam-evilbones-com.jpg|link=]]</nowiki> |
| - | : "Wizkam-evilbones-com.jpg" is the file name of the image uploaded in previous step. | + | :: "Wizkam-evilbones-com.jpg" is the file name of the image uploaded in previous step. |
| - | : "link=" removes http reference on the image. | + | :: "link=" removes http reference on the image. |
| - | : note that each image code element is separated by "|". | + | :: note that each image code element is separated by "|". |
<br clear=all> | <br clear=all> | ||
= Step 3: Record Page on Quest List = | = Step 3: Record Page on Quest List = | ||
Revision as of 06:52, 21 April 2014
Contents |
Summary
On this page we will go over how to create a new quest page, and as example, we will be creating the following page:
Konopatiy: Question to Kamlanty
But to save time, we will be copying coding template from this page:
Kamlanty: Evil Bones by the Lighthouse
Finally, we will replace the data.
Step 1: Log In
First you must login in order to make new pages or any changes.
Click "log in" on the top right, and enter your account details.
Step 2: Create New Page
As an example, we will create the "Konopatiy:Question to Kamlanty" quest page.
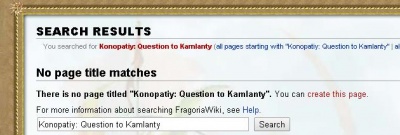
In the search box, type "Konopatiy: Question to Kamlanty", and do a search for that page. Since no page exists, search results will show "No page title matches", and will offer for you to create this page.
Save Blank New Page
For now, just create a new blank page by clicking "save". We will add content in the next steps.
Copy Coding From Another Quest
To make new pages quickly and efficiently, we will copy the coding of a previously created page.
Go to the Quest list, and open the page for Kamlanty: Evil Bones by the Lighthouse.
Or just click here:
Kamlanty: Evil Bones by the Lighthouse
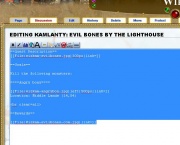
Then click the "Edit" button on the top of that page.
Next, copy the coding on the next page, and paste it on to the new page you have previously saved.
Replace Data
Since we copied the coding from previously created page, the actual info on the page is not correct and needs to be changed.
Save New Image Screenshots on Your Computer
You will most likely have to take new images of the quest pages.
We recommend a popular screenshot application called Lightshot for ease and quickness in making screenshots.
Visit their website to download the latest version for your computer:
Alternatively, you can read this page on how to make screenshots with Paint program (this program comes pre-installed on most systems).
Upload Screenshots
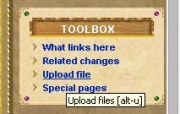
Under the Toolbox on the right side of the wiki, you can click "Upload file" to upload the screenshot.
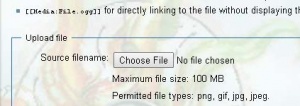
Then on the next page, click "Choose file" to find the screenshot you saved earlier on your computer.
Show Uploaded Screenshot on Page
The next step is to have the uploaded screenshot appear on the page you are working on.
Here are some examples of the image coding that needs to be saved onto the page:
- [[File:wizkam-evilbones.jpg|300px|link=]]
- "wizkam-evilbones.jpg" is the file name of the image uploaded in previous step.
- the 300px resizes the image
- "link=" removes http reference on the image.
- note that each image code element is separated by "|".
- [[File:wizkam-angrybon.jpg|left|500px|link=]]
- "wizkam-angrybon.jpg" is the file name of the image uploaded in previous step.
- "left" aligns the image to the left side of page
- the 500px resizes the image
- "link=" removes http reference on the image.
- note that each image code element is separated by "|".
- [[File:Wizkam-evilbones-com.jpg|link=]]
- "Wizkam-evilbones-com.jpg" is the file name of the image uploaded in previous step.
- "link=" removes http reference on the image.
- note that each image code element is separated by "|".


